Portfolio Website Guide

"If you don't have a website, you don't exist" they say...
...so better do it right! Building your online presence is not an easy thing. We tend to procrastinate, and when we finally decide to take a leap and design our website, we don't know where to start. It's tempting to spend hours scrolling for inspiration and then give up being overwhelmed with content. So here I am, coming with a little guide that helped me and I hope will help you too!
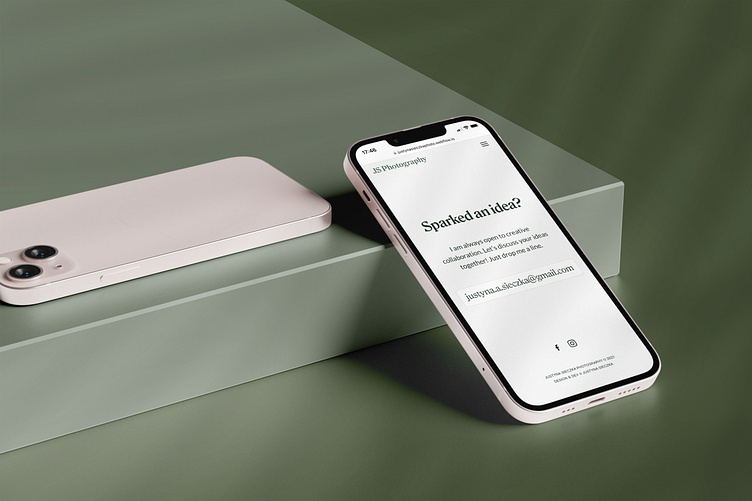
This is my photography portfolio website we'll be going through today.

1. First step
Before starting, ask yourself: what is the main reason for doing this? Perhaps you're in a hurry because you're a freelancer looking for new clients and a website could be the key to winning them over. Or maybe you're a designer who wants to expand their tech skills with some no-code tools and creating your own website is a perfect opportunity to do so (bonus point: it will add another project to your portfolio!) Alternatively, you may simply want it to be a casual side project without any time constraints. Whatever your reason may be, it's good. These were mine:
I wanted to have a personal space on the internet where I could showcase my photography independently of Instagram,
I was interested in finding potential clients for collaboration opportunities,
I wanted to learn Webflow badly and didn't care about how long it may take
You will find out soon why this first step is so essential ⤵
2. Analyze competitors
Take a closer look at the websites of your favorite designers/photographers/ anyone of your profession who you look up to, and try to break it down into smaller sections for analysis. It's best to take a look at real websites that are already up and running instead of just relying on concept designs that haven't been put into action yet.
Use these prompt questions and try to answer them:
What is the main content on their site?
What stands out at first sight?
Is the website easy to navigate?
Can you find contact details with no effort?
How do they highlight work in their portfolio? Do visuals or text dominate?
Are you tired after several clicks or you want to dig deeper and explore the website more?
Aren't you overwhelmed with spectacular interactions but have troubles with finding what you're looking for?
Done? Then we can move on to the next step.
3. Choose the website look & feel
You may already have a clear idea of what you want (and what you don't want) for your website. However, before diving into Figma and beginning to sketch, it's helpful to search for references that capture the desired look & feel. Dribbble has some excellent examples, but I personally recommend checking out the webflow marketplace for high-quality templates. While I don't suggest purchasing them they serve as great examples to learn from.
My look & feel principles were:
simple, classic, and timeless aesthetic - I don't want to constantly update the website's appearance to match current trends; the simplicity of a monochromatic style won't take away from the main focus of the page, which is the colorful and lively photographs
limited text and a lot of space for highlighting the images
subtle animations and transitions

4. Let's create!
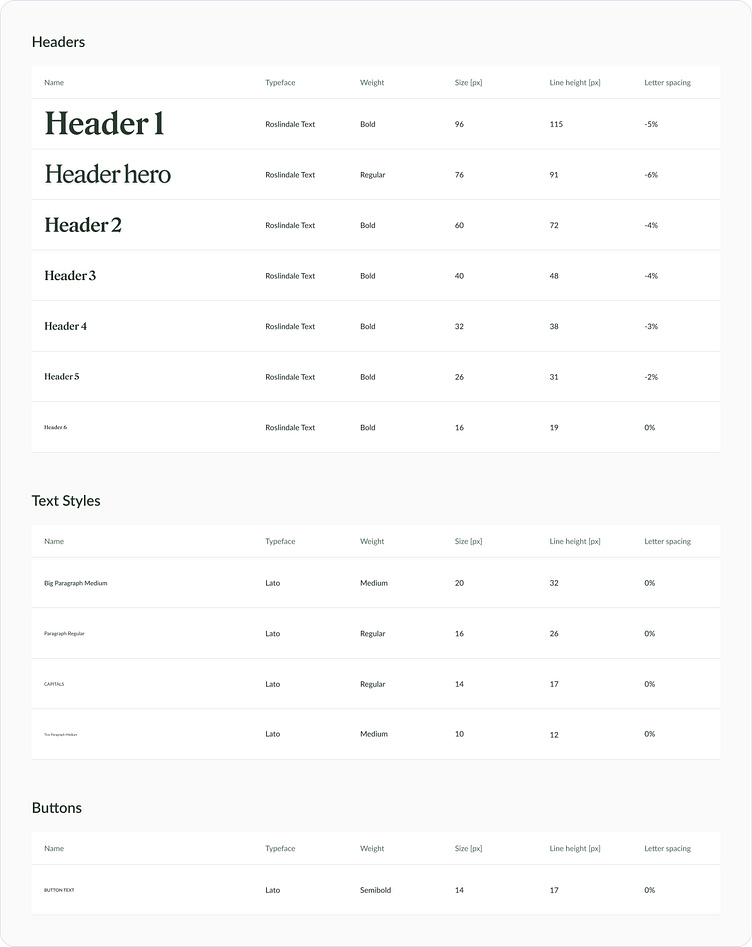
I used Figma to design my website's UI, which took 2-3 days. As I worked on it, I made some updates based on what looked best live (trust me, some ideas look good only on canvas). I also made a simple style guide in Figma with emphasis on typography, since that's a crucial part of making a website look great. Finally, I set up 3 main breakpoints for the more complex pages and adjusted the rest live in Webflow.

5. Choose a tool
Since I wanted to improve my tech stack, I opted for Webflow as my go-to platform. However, it's crucial to select a tool that serves your needs rather than the other way around. While simpler alternatives are available, they might only allow for a bit of personalization. It's essential to balance ease of use and the ability to customize your content to fit your unique requirements. Some others tools including website builders that I encourage you to further explore are: Wix, Squarespace and Framer.
Now, a couple of thoughts on using Webflow:
I have experience in using HTML, CSS, and JS basics, which made transferring the project from Figma to Webflow an easy and intuitive process.
Webflow offers excellent resources for learning and has a supportive community that helped me resolve technical issues.
Although it's a no-code tool, custom code may be necessary to achieve desired results. In my case, I used it for the slider and element customization, such as background grain, scrollbar, and selection color. Also, keep in mind that you need to upgrade to a higher, quite pricey plan to be able to run your script.
6. Set analytics
Last but not least. Set analytics for your website to track its performance and visitors behavior. Adding Google Analytics to your Webflow page is a piece of cake. Remember, testing your design is essential.
Good luck!
I hope you like it!
If you have any questions or just want to say hello, contact me on LinkedIn 🙋🏻♀️